Hoi allemaal! Mijn vriendin Fiona (zie hieronder) en ik gingen een dagje naar Haarlem, gewoon voor de gezelligheid, want wat is het toch een leuke stad, maar we waren ook op zoek naar een kobaltblauwe sjaal.
En natuurlijk, als je niet op zoek bent vind je allerlei leuks en moet je droog brood eten tot het eind van de maand, maar zoek je iets specifieks dan kun je het niet vinden.
Gelukkig heeft Fiona een vriendin die gek is op haken haha!
En nog meer geluk, bij Zeeman verkochten ze precies de goede kleur garen, van Supersoft!
Hi everyone! My friend Fiona (see picture) and I went to Haarlem. It is a lovely city! When you're in Holland make sure to visit it, there are lot's of places for yummie food and drinks, and some really nice shops.
We wanted to shop for a cobalt blue scarf. How come that when you're not looking for anything special you end up with an empty bank account, but when you want something specific you can't find it?!
Anyhow, Fiona is lucky she's got a crafty friend haha!
And more luck: I found the right colour of yarn that same day!

Ik wilde iets warms maar toch luchtigs haken, dus ik gebruikte 3 draden tegelijk met een grote haaknaald. Ik was lekker aan het uitproberen, en opeens dacht ik, wat voor effect zou het geven als ik bij de ene steek de voorste lus gebruik en bij de volgende de achterste lus... Het volgende moment dacht ik een nieuwe steek uitgevonden te hebben maar dat bleek een beetje pretentieus want iemand was me al voor hahaha. Jammerdebammer, het blijkt de 'front and back loop stitch' te heten.
Ook een naam voor mijn ontwerp was minder makkelijk dan ik dacht, want de Fiona sjaal bestaat al en de Scribbly Stitch Scarf of de Wave Stitch Scarf vielen al af omdat het geen nieuwe steek was.
Ik woon in de buurt van de kust en het effect van de steek doet me een beetje denken aan zee en strand, vinden jullie ook niet?
Dus van Sandy Scarf en Wave Scarf werd het de Rippled Beach Scarf, want het lijkt nog het meest op de golvende strepen die de zee soms achterlaat op het strand.
I wanted to make something warm and fluffy, so I used 3 skeins and a large hook. I was trying out several things, and then suddenly this idea popped in my head. What kind of effect would it have if I first used the front loop only and the back loop only for the next stitch... The following moment I thought I had come up with a new stitch, but alas, I was a bit pretentious, somebody else had thought of it way before me hahaha. What a bummer, it's the 'front and back loop stitch'.
Also naming my scarf wasn't easy. I wanted to call it the Fiona Scarf, since my friend was my inspiration, but that also already exists. The Scribbly Stitch Scarf and the Wave Stitch Scarf were not suitable either, since it wasn't a new stitch.
I live nearby the coast, and the effect reminds me of sand and sea don't you think?
So from Sandy Scarf and Wave Scarf it became the Rippled Beach Scarf, because it sure looks like the wavey stripes that are left behind on the beach by the sea.

De sjaal is zo lekker warm en zacht dat ik er ook eentje voor mezelf wilde, en zo kon ik meteen het patroon mooi uitwerken. In roze, want ik heb al een kobaltblauwe jas.
Je hebt 6 bolletjes Supersoft van Zeeman nodig, of een vergelijkbaar garen, haaknaald 3/4, ongeveer 200 meter of 50 gram per bol.
Haak met 3 draden tegelijk: 21 lossen (dan hou je genoeg over voor een muts) of 27 lossen voor een bredere sjaal. Het mooiste is als je begint met haaknaald 15, en dan overgaat op haaknaald 12, maar meteen beginnen met haaknaald 12 kan ook.
Het werkt het makkelijkst met de centre pull, dus de draad uit het midden. Als je niet weet wat dit is, kijk dan vooral even naar deze tutorial, want het is echt één van de beste haaktips die ik ooit kreeg!
The scarf is so warm and soft that I wanted one for myself too, and it was a good reason to write down the pattern. In pink this time, because I have a cobalt blue coat.
You'll need 6 balls of yarn suitable for hook 3/4, appr. 200 m or 50 gr per ball.
Start with 21 chains (so you'll have enough for a hat) or 27 chains for a bigger scarf. It looks best if you crochet the chains with hook size 15, and the rest with size 12, but if you don't have one size 12 will do fine too.
It's easiest to work with a centre pull yarn. If you don't know what that is, make sure to check this tutorial, because it's the best crochet tip I ever got by far!

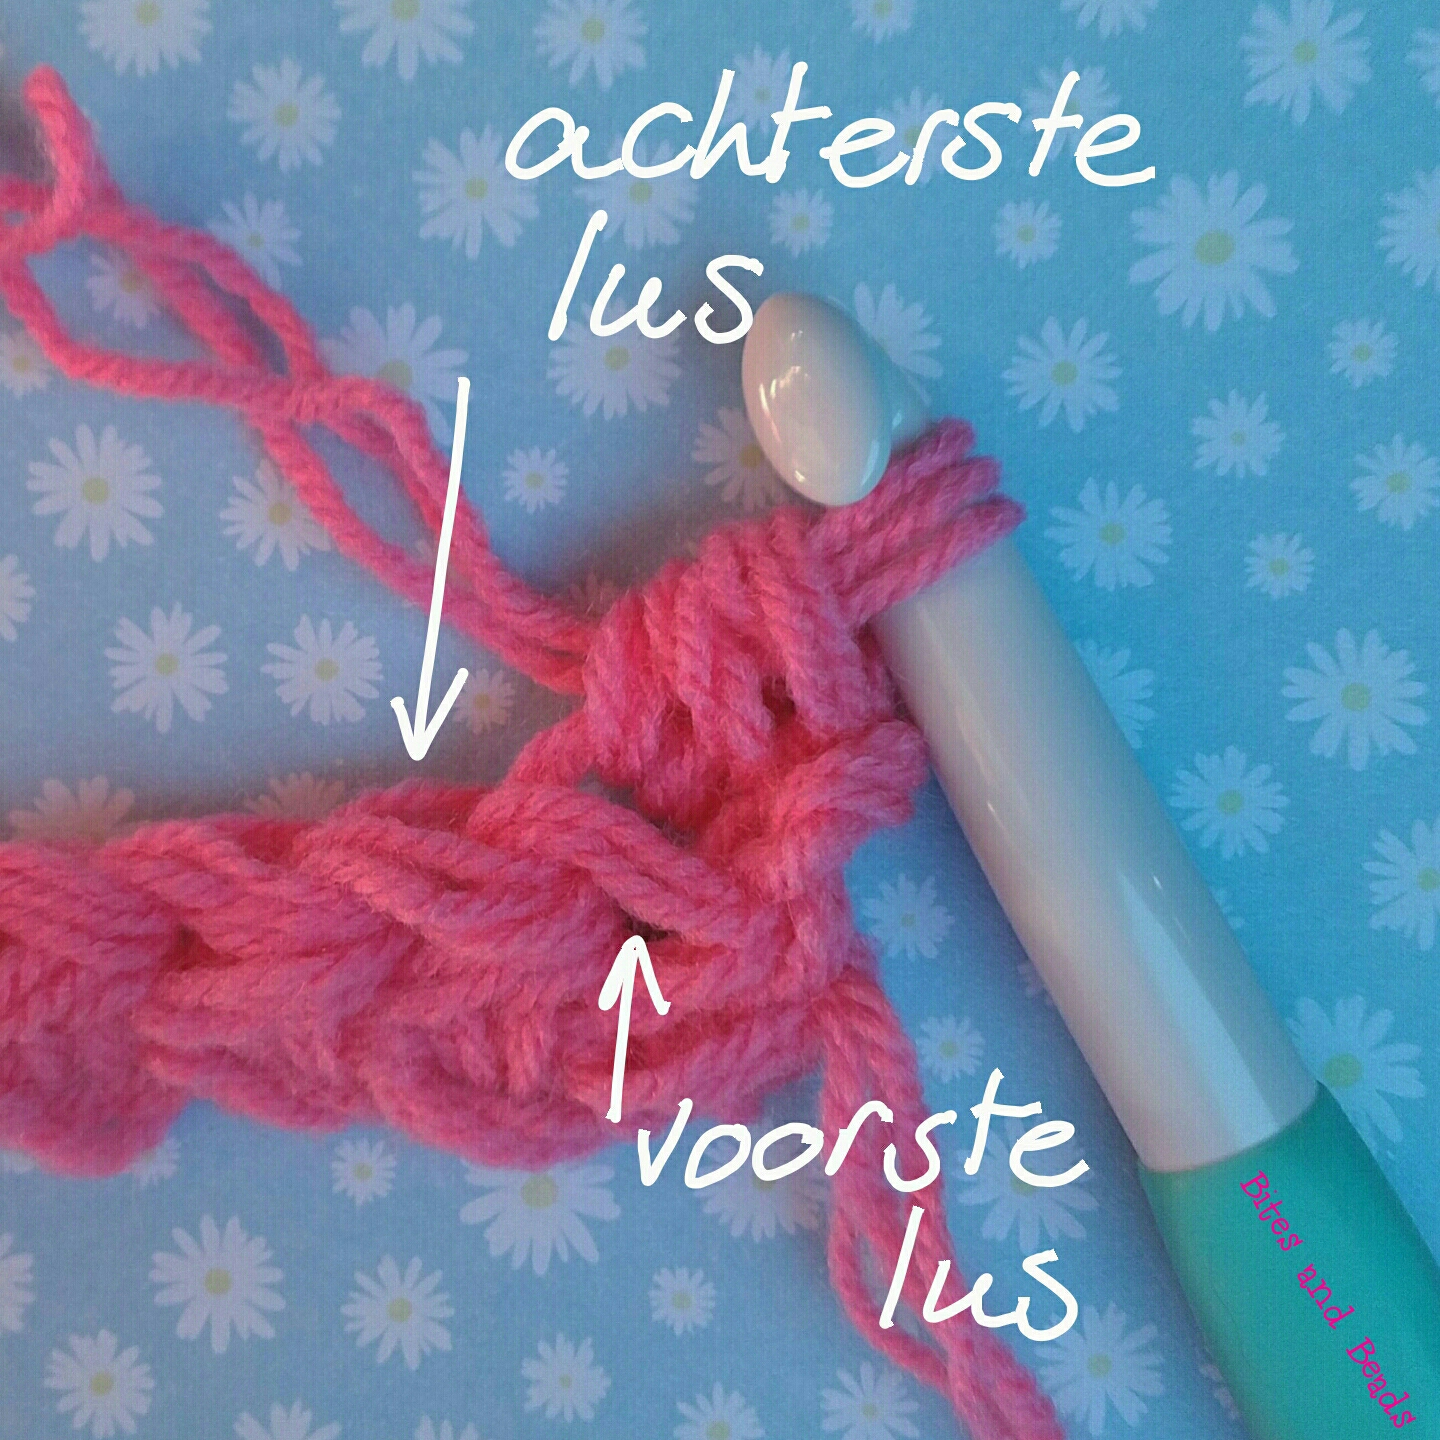
Sla 2 l over, haak in elke ONDERSTE lus een hst, (19 of 25 hst, zo hou je er 20/26 over).
Als het je niet helemaal duidelijk is wat ik bedoel, hier heb ik ook een blogpost over geschreven:
Skip 2 ch, and crochet a half double crochet in each of the loops on the BACKSIDE, (19 or 25 hdc, so you'll end up with 20/26 stitches)
If it's not clear what I mean, I also did a blogpost on this:

Haak in de vlgd toer 2 l als 1e hst, en daarna 1 hst om en om, eerst in de achterste en dan in de voorste lus. Steek bij beide je haaknaald aan de voorkant in. Je eindigt met een hst achter.
Haak in de vlgd toer een hst om en om, eerst in de voorste en dan in de achterste lus. (Aan de voorkant insteken, je eindigt met een hst voor.)
In the next round start with 2 chains, and then alternately 1 hdc in the back loop and the next in the front loop. You'll end with a hdc in the back loop.
In the next round you start with 2 chains, and then alternately 1 hdc in the front loop, and the next in the back loop. You'll end with a hdc in the front loop now.
Herhaal toer 2 en 3, ongeveer 75 toeren. Op een gegeven moment wordt het wat lastiger om je draden uit de bollen te trekken, en ik loste dit op door ze met z'n drieën tegelijk om een lege rol aluminiumfolie te wikkelen.
Repeat these 2 rows alternately, about 75 rows in total. Once it becomes harder to pull your yarn from the centre, you can wind the 3 skeins together on an empty roll of aluminium foil for example.

Na ongeveer driekwart moet je nieuwe draden aanhechten. Als je gehaakt hebt zoals ik zal dit per bol verschillen, maar daardoor zal de overgang naar een nieuwe draad des te minder opvallen.
Hieronder zie je hoe je de draad het meest onzichtbaar weg kunt werken, de uitgebreide tutorial vind je eventueel hier:
Changing your yarn is mostly invisible if you do it like this, especially when you don't cut the three threads at the same length.
You can find the full tutorial on it here:

Als je je sjaal lang genoeg vindt, haak je een rij halve stokjes in de hele steek in plaats van in de voorste en achterste lussen.
When you think your scarf is long enough, end with a row of half double crochets in the hole stitch instead of the front and back loops.

Daarna nog één toer halve vasten, en werk de uiteindes weg met een scherpe naald.
One more row of slip stitches makes a neat finish.

Zie je, zo zien beide kanten er redelijk hetzelfde uit.
See, now both sides really look alike.

Als je de smalle sjaal haakt heb je zeker nog genoeg voor een bijpassende muts. Misschien ook wel met de brede sjaal maar dat heb ik niet uitgeprobeerd. Ik was geïnspireerd door de 'Hey Muts' van Wimke Tolsma, maar ik heb het patroon helemaal aangepast.
I was inspired by the 'Hey Muts' by Wimke Tolsma, but I changed the pattern quite a bit.

Haak weer met 3 draden tegelijk en haaknaald 12.
Toer 1: haak met drie draden 4 lossen (l) en sluit met een halve vaste (hv)
Toer 2: haak 3 l (staat voor 1 stokje) en 11 stokjes (st) en sluit met een hv
Toer 3: haak 3 l en verdubbel het aantal, haak 2 stokjes in elke steek, de eerste in de voorste, en de 2e in de achterste lus van de steek. Sluit met een hv (24).
Toer 4: haak 3 l (= de 1e steek) en haak weer om en om in de voorste en achterste lussen. In de 1e twee steken 1 stokje, en in de 3e haak je 2 st in 1 steek (dus steeds 1 in de voorste, 1 in de achterste, 2 stokjes in dezelfde steek: de 1e in de voorste, de 2e in de achterste; 1, 1, 2, stokjes, etc.) en sluit met een hv (36). Het zijn dus clusters van 4 als je de tel kwijt raakt.
Toer 5: haak 3 l en haak in iedere steek 1 st, na 4 st haak je 2 st in dezelfde steek (dus 1, 1, 1, 1, 2 stokjes). De 1e in de voorste lus, de 2e in de achterste lus, de 3e in de voorste lus, de 4e in de achterste lus, de 5e en de 6e in de voorste en achterste lus van dezelfde steek. Clusters van 6.
Je houdt 2 steken over, dus dat is 1 in de voorste en 1 in de achterste lus, sluit af met een hv.
Toer 6-10: haak 3 l en haak in iedere steek 1 stokje, om en om in de voorste en achterste lus. Ga door totdat je muts de gewenste lengte heeft, bij mij was dit dus 10 toeren.
Toer 11: haak in iedere steek 1 vaste.
Maak eventueel een pompon of een bloem, naai hem vast en klaar is de muts!
Als je het leuk vindt, ik maakte ook een tutorial over hoe je er een voering in kunt maken:
Again use 3 skeins and hook size 12.
Als je het leuk vindt, ik maakte ook een tutorial over hoe je er een voering in kunt maken:
Row 1: make a ring of 4 chains and a slip stitch in the first chain.
Row 2: crochet 3 chains (=first double crochet) and 11 double crochets. Close with a sl.st.
Row 3: Start with 3 chains, and double the amount of stitches by crocheting 2 d.c. in every stitch. One in the front loop and one in the back loop (24). Close with a sl.st.
Row 4: 3 ch for the first d.c. and then again alternately in the front and back loop. In the first two stitches 1 d.c., and in the third stitch 2 d.c. in the same stitch, one in the front loop and one in the back loop (so 1,1,2 stitches, they are clusters of 4 stitches if you loose count). Close with a sl.st (36).
Row 5: 3 ch and one d.c. in every stitch. In the fifth stitch you crochet 2 d.c. in the same stitch, one in the front, and one in the back loop (so 1, 1, 1, 1, 2 d.c.). To make it more clear: the first in the front loop, the second in the back loop, the third in the front, the fourth in the back, the fifth and sixth in the front and back loop of the same stitch). You'll be left with 2 stitches, so that means 1 d.c. in the front, and 1 d.c. in the back loop. Close with a sl.st.
Row 6-10: 3 ch and 1 d.c. in every stitch, alternately in the front and back loop, close with a sl.st.
Row 11: 1 single crochet in every stitch.
Make a pompom or a flower if you like, sew it on and you're hat is finished!
If you like, I also did a tutorial on how to line your hat:
If you like, I also did a tutorial on how to line your hat:

Mocht er iets niet duidelijk zijn dan hoor ik het graag. Je kunt me eventueel ook vinden op Instagram of Twitter. Veel haakplezier!
If anything is not clear let me know. You can also find me on Instagram or Twitter. I wish you lots of crochet fun!

Reacties
Een reactie posten